Automating Unraid Array Decryption
Disclaimer: This is not meant to be start from basics tutorial. The following assumes that you are familiar with LUKS encryption and Unraid basics.
Overview
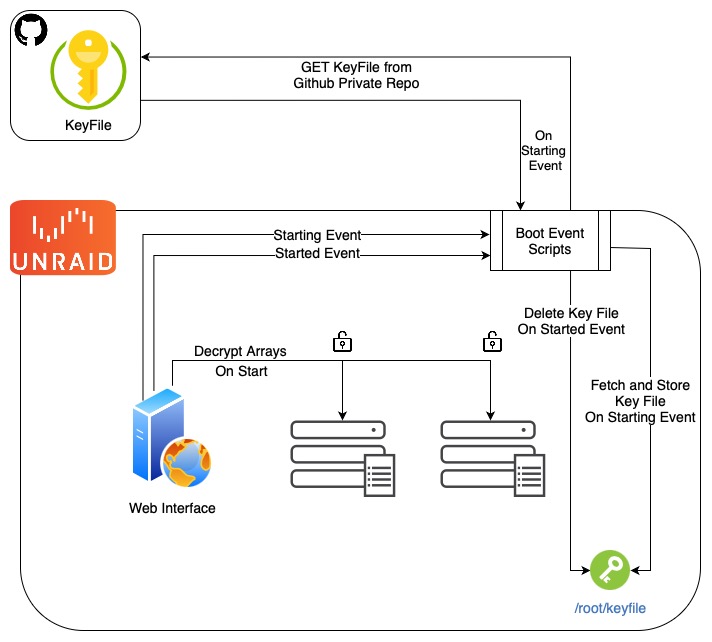
As an Unraid user, manually entering encryption passwords at every system boot can become tedious and inconvenient, especially when your family relies on the running services and you’re not home to bring the array back online.
There’s several ways to go about doing this, the approach I settled on was to leverage Github private repository as a secure key storage solution, and retrieve it temporarily on boot for decryption.
Why This Approach?
- Eliminates manual password entry during boot
- Off-site key-file that can be revoked remotely from Github
- Uses temporary key storage locally, removing the key-file after decryption
- Leverages Unraid’s event system for reliable automation
- Balances security with convenience while following best practices
The Implementation
Setting up a new LUKS Key-file
Let’s create a new key-file that can decrypt the encrypted drive(s). LUKS supports multiple authentication methods per drive, upto 8 for LUKS1 and 32 for LUKS2 (LUKS man page reference). This allows us to maintain our existing passphrase(s) while adding a new key-file.
# Check available keyslots
cryptsetup luksDump /dev/sdb1

# Generate a cryptographically secure keyfile
dd if=/dev/random bs=32 count=1 of=my-keyfile

# Add the keyfile to your encrypted drive
cryptsetup luksAddKey /dev/sdb1 /path/to/my-keyfile
>Enter any existing passphrase:
Secure Key Storage
We are using Github private repository as a key storage solution, so
let’s create a new one — for this example I’m going to assume the repo name
foobar. Once the repository is created, upload the my-keyfile from
previous step.
We are going to be accessing the my-keyfile using Github’s “Fine-Grained
Personal Access Token”, to enable minimal read permissions and access
authenticated API access.
We can create and manage them under Profile -> Settings -> Developer Settings,
or by accessing the direct link — Personal Access Token Settings.
When creating a new token, we want to grant access to the single repository,
foobar with the following permissions:
- Contents: “Read-only” — Fetch the key-file
- Metadata: “Read-only” — Required for repository access
Unraid Automation
We’ll leverage Unraid’s event system to manage the keyfile securely. Here’s how we’ll modify the startup process:
- Adding custom boot scripts
# Set up directory for custom scripts
mkdir -p /boot/custom/bin

# touch script files
touch /boot/custom/bin/{fetch_key,delete_key}
- Create script to fetch key-file in
/boot/custom/bin/fetch_key
Here the github_pat_XXXyyyZZZ is the Personal Access Token we generated in
Github, and /username/foobar is the username and repository name used.
#!/bin/bash

# Only fetch if keyfile doesn't exist
if [[ ! -e /root/keyfile ]]; then
  curl -H "Authorization: token github_pat_XXXYYYZZZ" \
    https://raw.githubusercontent.com/username/foobar/main/my-keyfile \
    -o /root/keyfile
fi
- Create script to delete key-file after use in
/boot/custom/bin/delete_key
#!/bin/bash

# Remove keyfile after successful array start
rm -f /root/keyfile
- Edit
/boot/config/goto set up our event handlers, this file is used to launch Unraid’s management interface.
#!/bin/bash

# Configure event handlers for keyfile management
# Create event directories if they don't exist
mkdir -p /usr/local/emhttp/webGui/event/{starting,started,stopped}
# Copy over the event scripts
cp -f /boot/custom/bin/fetch_key /usr/local/emhttp/webGui/event/starting
cp -f /boot/custom/bin/delete_key /usr/local/emhttp/webGui/event/started
cp -f /boot/custom/bin/fetch_key /usr/local/emhttp/webGui/event/stopped
# Make the scripts executable
chmod a+x /usr/local/emhttp/webGui/event/{starting/fetch_key,started/delete_key,stopped/fetch_key}

# Launch Unraid's management interface
/usr/local/sbin/emhttp &
Enabling Automatic Array Start in Unraid
Finally, we need to enable automatic array start in Unraid web interface:
- Navigate to Unraid’s web interface
- Go to Settings -> Disk Settings
- Set “Enable auto start” to Yes.
Security Considerations
This implementation includes several security considerations:
- The key-file is only present on the system during the decrypt process
- GitHub access is restricted to read-only operations on a private repository
- The Personal Access Token has minimal scope
- The original password remains as a backup decryption method
Conclusion
This setup provides a secure and automated way to decrypt the Unraid array at boot while maintaining security best practices. The key-file is fetched only when needed and immediately removed after use, minimizing the window of exposure.
Remember to keep your Github token secure and regularly audit your security settings. While this automation adds convenience, it’s crucial to maintain secure backups of your encryption credentials.
References
- LUKS key slots reference, highlighted— https://man7.org/linux/man-pages/man8/cryptsetup-luksAddKey.8.html#:~:text=key-slot%20option.-,The%20maximum%20number%20of%20key%20slots%20depends%20on%20the%20LUKS,0%20and%2031%20for%20LUKS2.
- RedHat guide to adding additional keys — https://access.redhat.com/solutions/230993
- Unraid forum discussion about using startup events — https://forums.unraid.net/topic/61973-encryption-and-auto-start/?tab=comments#comment-648148
- Gist referenced for example fetching key at startup — https://gist.github.com/LeonStoldt/51baa2ba2b879254cf5f50d381264bcc
I’m trying to get better about writing about things I do. Let me know if you found this useful 🙂 .
Connect with me on LinkedIn .